How to Troubleshoot QuickBooks Error Code H202?

QuickBooks Error Code H202 appears while accessing QuickBooks in the multi-user mode. This error reflects that the multi-user connection to your server computer is being blocked. This error can be very annoying, preventing you from gaining access to your QuickBooks company file(s). Resolving this error thus becomes essential.
This article shall guide you with viable troubleshooting methods for uprooting the QuickBooks Error Code H202. Follow this invaluable article until the end to find answers to all your questions related to the error. You may see the following error message on your desktop:

What Causes QuickBooks Error H202?
The following reasons contribute to the Error H202 in QuickBooks.
- Erroneous settings related to hosting configuration.
- Firewall obstructing bidirectional communication.
- DNS server conflict.
- QuickBooks can’t find the IP address of the host system or server that’s hosting the company file.
- Some essential QB-related services such as ‘QuickBooksDBXX’ and ‘QBCFMonitor’ aren’t running on the server PC.
- Damaged or Corrupted network data file (.ND).
Walkways to resolve the QuickBooks Error Code H202
Let us now navigate across the most viable walkways to troubleshoot the Error Code H202 in QuickBooks Desktop. Just make sure that you follow each procedure in the same order as has been provided in this article.
Walkway 1: Ensure that QuickBooks Services are running
You need to make sure that essential QB-related services are running. To ensure the same, follow the directions given below:
- In the Windows search box, type ‘Run.’
- Open the ‘Run’
- Type in ‘ msc’ in ‘Run.’
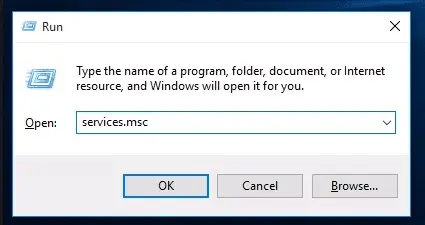
- Then, press the ‘Enter’
- In the ‘Services’ window, browse and double-click ‘QuickBooksDBXX’ (XX denotes the QuickBooks version).
- The window ‘QuickBooksDBXX Properties’
- Choose ‘Automatic’ as ‘Startup‘
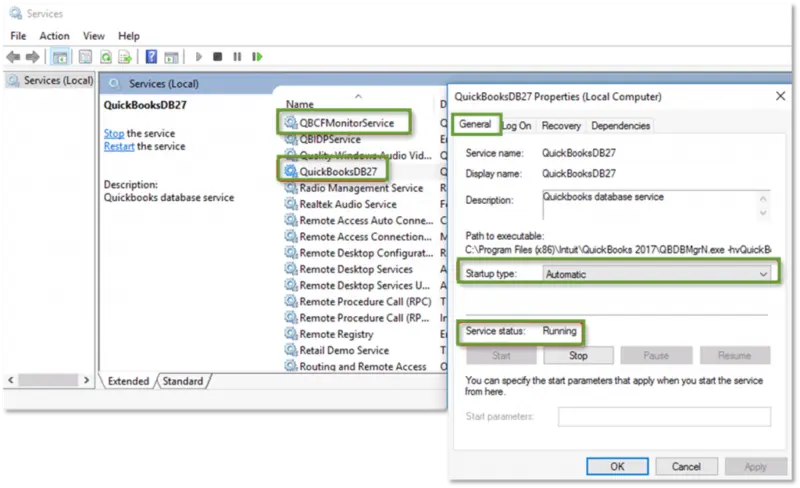
- The ‘Service Status’ must be either set to ‘Running’ or ‘Started.’ Or select ‘Start.’
- After that, select the ‘Recovery’
- Select ‘ Restart the Service.’ You need to restart the Service from all three drop-down menus (First failure, Second failure, and Subsequent failures).’
- Choose the ‘Recovery’
- To save the changes, click ‘Apply’ and then ‘OK.’
- Follow similar steps for ‘QBCFMonitorService.’
- Open QuickBooks on each workstation once you’ve finished implementing the procedure on ‘QBCFMonitorService.’

- Select the ‘Switch to Multi-user Mode’ option from the ‘File’
- Verify whether the QuickBooks Error Code H202 got uprooted from your system. If it still continues to be a source of botheration, jump to the following solution.
Walkway 2: Test your Network Connectivity
Follow these steps to ping your server:
- Type ‘Run’ into the Windows ‘Search’
- Open the ‘Run’
- Type in ‘cmd’ within the search box in the’ Run’ window, and press the ‘Enter’
- Enter ‘ping [servername]’ & press the ‘Enter’

- In case you identify any packet loss, the network needs to be repaired.
Walkway 3: Include your Server to Windows Host File

Follow the steps below to add your system server to the Windows host’s file:
- Open the Windows host file (on the PC that is causing the error) by heading to any of the following locations:
- C:\Windows\System32\Drivers\Etc.
- C:\Windows\Syswow64\Drivers\Etc.
- Open the host file by double-clicking it.
- Select Notepad when prompted with ‘How do you wish to open this file.’
- After the last IP address in the host file, type Server’s IP address, followed by server name.
- Update your Host File with server information.
- Select ‘Save’ from the ‘File’
- Select’ Exit.’
- Now, try accessing your company file in the ‘multi-user mode’ after completing the foregoing steps.
- If this procedure did not resolve the problem, move on to the next option.
Walkway 4: Make a New Folder for Your QBW File
- Create a new folder on the server computer.
- Share the folder and set up folder &Windows access permissions for sharing the company files.
- You now need to copy the QuickBooks Database QBW file to the newly created folder.
- Return to multi-user mode of QuickBooks and open your company file.
- Check if the issue got rectified.
Walkway 5: Restart QuickBooks Database Server Manager
- In the Windows ‘Search’ bar, type ‘Run.’
- Open the ‘Run’
- Type’ msc’ in the Run window and press the ‘Enter’ key.
- You need to right-click on ‘QuickBooksDB19 (2009)’, ‘QuickBooksDB18 (2008)’ or ‘QuickBooksDB17 (2007)’ and then choose ‘Stop.’
- Select ‘Start’ after right-clicking.
- Exit the window.
- Now, right-click the ‘Windows start’ button and select ‘Explore.’
- Then head to ‘Tools,’ followed by ‘Folder Options.’
- Head to the ‘View’ tab and uncheck the ‘Hide extensions for known file types.’
- Select ‘Show hidden files and folders ‘ from the ‘View’ menu
- Unmark the ‘Hide protected operating system files ‘ box.
- Click ‘Yes’ in the Warning window, then choose the ‘OK‘ tab.
- Now close the Windows Explorer.
- Restart QuickBooks and verify if the error H202 got fixed.
Walkway 6: Delete and Recreate the ‘.ND’ file
- Type’*.ND’ in the ‘Windows search’ box and press ‘Enter.’
- Right-click the ‘. ND’ file in the Results window and select ‘Delete.’
- After that, press the ‘Windows Start’
- Choose ‘All Programs,‘ followed by ‘QuickBooks,’ and then choose ‘QuickBooks Database Server Manager.’
- Select the ‘Scan Folder’
- Select ‘Add Folder’ and navigate to the company file folder.
- Click the ‘OK’ button after selecting the company file.
- To begin the scanning process, click on ‘Scan.’
- Wait for the scan to conclude. When the scan is finished, click ‘Close.’
- Open QuickBooks and ensure that QuickBooks Error Code H202 has been fixed successfully.
Through this article, we provided you with all the reliable methods for troubleshooting QuickBooks Error Code H202. If the problem continues even after implementing all the walkways enumerated in this article, you can seek assistance from our QuickBooks enterprise support Team via our dedicated helpline at 1-800-761-1787.

